Showing posts with label challenges. Show all posts

Sunday, March 10, 2013

RemARKable Stamp of the Month Blog Tour - Ciao, Baby!

Welcome to the RemARKable Stamp of the Month Blog Tour.  This month some of our most talented RemARKable teammates are showing you many different ways to use the Ciao, Baby! stamp set from the Stampin' Up! Spring Catalog. 

Here's my first creation:
It's been a while since I sent my husband a card at work.  This one will go in the mail tomorrow.
I paired the Ciao, Baby! stamp set with Fabulous Phrases to create this card.  I ran the Pool Party Core'dinations paper through the Big Shot with the Perfect Polka Dots embossing folder, then sanded it.  I punched the stamped image using the new Sale-a-Bration Petite Curly Label punch, then backed it with a cut layer of Island Indigo.   I stamped the "forever" using the Fabulous Phrases stamp set, then punched it out with the Curly Label punch.  I've entered this card in the Freshly Made Sketches challenge.

Here's my second creation:


This is the first completed card that I made with the Dress Up framelits. They are too cute!!!  The bottom layer of the dress is made from a Floral District designer series paper, then I added a hem of Primrose Petals followed by a Paper Doily layer.   I completed the ensemble with a string of pearls.


...Next up on the RemARKable Blog Tour is Tamra Davis.  Click on the image below to get to her blog or copy and paste her blog address into your browser (www.thecardladies.com):


Stamps: Ciao, Baby!, Fabulous Phrases
Paper: Whisper White, Island Indigo, Tangerine Tango, Pool Party Core'dinations paper, Sycamore Street designer series paper (Sale-a-Bration item!), Baja Breeze, Primrose Petals, Crumb Cake, Floral District designer series paper
Ink: Island Indigo, Baja Breeze, Rich Razzleberry
Accessories: Big Shot, Dress Up framelits dies, Ovals Collection framelits, Perfect Polka Dots embossing folder, Fancy Fan embossing folder, Finishing Touches edgelits, Petite Curly Label punch (Sale-a-Bration item!), Curly Label punch, Paper Doilies, Basic Pearls, Stampin' Dimensionals


Happy Stamping!

Wednesday, February 20, 2013

Mom's Birthday Card


My mom's birthday was yesterday. We're going to celebrate by going out to dinner tomorrow night.  In the meantime, I made her this card:

I have to admit that I don't send Mom cards often enough.  Sorry Mom!  (I do give her cards to send to others, though.)
I'm entering this card in the Freshly Made Sketches challenge. Check it out!


Stamps: Hello Doily, Field Flowers, Delightful Dozen, Bring on the Cake (inside sentiment - no photo )
Paper: Very Vanilla
Ink: Sahara Sand, Always Artichoke, Rich Razzleberry
Accessories: Extra-Large Oval Punch, Vanilla Seam Binding, Stampin' Dimensionals

Happy Stamping!

Sunday, December 9, 2012

RemARKable Blog Tour -- Affection Collection


Welcome to the RemARKable Stamp of the Month Blog Tour.  This month we're featuring projects using the stamp set Affection Collection.  You may have arrived here from Jackie Bottomley's blog.  What creative projects she put together!!!


This stamp set is one that I received at the Stampin' Up! Convention last summer.  I've used it a few times since then.  But I have to admit that it's not one that I would have purchased because it's just not my style.  This blog hop was a good exercise in stretching my creativity.

Here's what I came up with:

I used my Stamp-a-ma-jig to stamp onto the Floral District designer series paper using Chocolate Chip and Crumb Cake ink.  Then I stamped the Love image on Very Vanilla, cut it out, then sponged it with Crumb Cake.  I added Large Pearls and some ribbon.  I layered that piece onto Crumb Cake, then adhered it to a Riding Hood Red card base.

I made another one using the same color combination.  This time I followed a sketch challenge, Freshly Made Sketches.
For this card, I inked up my Fancy Fan embossing folder with Crumb Cake ink, the transferred the folder design onto Crumb Cake card stock with a brayer.  This is a technique I learned while I was at convention last summer. I punch the Friend image using the Modern Label punch and adhered it to the Riding Hood Red image with Stampin' Dimensionals.

Up next on the tour is Deb Currier. Click on the image below to go to her blog.


Stamps: Affection Collection
Paper: Riding Hood Red, Crumb Cake, Very Vanilla, Chocolate Chip, Floral District designer series paper
Ink: Baja Breeze, Chocolate Chip, Crumb Cake, Riding Hood Red
Accessories: Fancy Fan embossing folder, Large Pearls, Corner Rounder punch, Dotted Scallop Ribbon Border punch, Modern Label punch, Early Espresso 1/4" Stitched Grosgrain ribbon, Stamp-a-ma-jig, Stampin' Dimensionals

Happy Stamping!

Friday, November 16, 2012

Nacho Average Challenge #20

I was in need of some Thank-You cards, so I decided to take the Nacho Average Challenge #20
Nac20color
Here's what I came up with:

The designer paper in the background is from Comfort Cafe.

Here's a peek of the inside.
I got this stamp set for free from Stampin' Up! and this is the first time I used it.  Hope you like the card.

Stamps: Flowering Flourishes, Fabulous Phrases (a little alliteration there!)
Paper: Baja Breeze, Whisper White, Summer Starfruit, Twitterpated designer series paper
Ink: Midnight Muse, Baja Breeze
Accessories: Big Shot, Window Frames Collection Framelits, Small Oval punch, Basic Pearls, Stampin' Dimensionals

Happy Stamping!

Tuesday, September 11, 2012

Fab Friday Challenge

Hi, everyone!  I found a cool, new challenge to participate in called Fab Friday.  I used the sketch challenge to create one of the cards for my Fun, Fabulous, Fall Stamp Camp.  I'm all filled up for Wednesday, but do have a few spots left in my Thursday class.  Here's the card:


I love, love, love the new Woodgrain embossing folder!!!  The new Early Espresso Core'dinations card stock works lovely with this project, don't you think?

I used France Martin's idea on how to create veined leaves with the Woodgrain embossing folder.  The designer series paper is from the Orchard Harvest collection.  I got that dsp for free at Convention!  I used other patterns from that pack in another one of my Fun, Fabulous, Fall cards.  A post of that one will be coming soon!

Here is the original sketch:


Stamps:  none
Paper: Crumb Cake, Early Espresso Core'dinations, Orchard Harvest designer series paper, Cherry Cobbler, Old Olive, Cajun Craze, More Mustard
Ink: Soft Suede (for sponging)
Accessories: Big Shot, Autumn Accents Bigz Die, Woodgrain embossing folder, Stampin' Sanding System, Brushed Bronze Designer Buttons, Linen Thread, Stampin' Dimensionals

Happy Stamping!

Monday, September 10, 2012

Thanks a Bunch - Freshly Made Sketches

Here's a card that I made for Freshly Made Sketches.  

This is the first time I created something using the International Bazaar designer series paper.  This is also the first time I've used the Window Frame Collection Framelits, the zigzag edge from the Finishing Touches Edgelits, and the Friendship Preserved stamp set.  The green color in this paper pack is Lucky Limeade  Unfortunately, my stash of that card stock has been depleted.  So I substituted Old Olive.  In this case, I think the green shades blend well together.  Old Olive and Chocolate Chip is a favorite color combination of mine.

Here's another peek:

Tell me what you think about this card.

I still have to share my creations from last week's Convention Stamp Camp.  Now I'm busy putting on the finishing touches to my Fun, Fabulous, Fall Stamp Camp cards.  I'll show both of those sets of cards during the next few weeks.

Stamps: Friendship Preserved
Paper: Old Olive, Chocolate Chip, Whisper White, International Bazaar designer series paper
Ink: Chocolate Chip
Accessories: Big Shot, Window Frames Collection Framelits, Finishing Touches Edgelits, Lucky Limeade Ruffled Ribbon, Stampin' Dimensionals

Happy Stamping!

Sunday, July 15, 2012

One More Day Till I Leave for CONVENTION!!! -Freshly Made Sketchs #43

Hey!   I don't know if you're counting or not, but there's only one more day till I leave for the Stampin' Up! convention in Salt Lake City!!!  I am going to try as best I can to not even think about what is happening with Randy and the kids and focus on having a great time.  No guilty feelings about leaving my family.  It's about time that I let myself have a much-needed break from all the chaos.  What better way to combine fun with my job!?!  I figure that the house is going to get trashed, then they'll all clean up the day that I get back home.  They're still going to get lots of love from Daddy!

Yesterday I stocked the cupboards with a bunch of junk food to the tune of almost $200.  And at Randy's request, I gave him some menu suggestions:

I said, "Grilled hamburgers."  He said, "Burger King!"
I said, "Spaghetti and Meatballs."  He said, "Pizza Hut!"
I said, "Chicken patties."  He said, "Kentucky Fried Chicken!"

Let's just hope he was joking.

Onto the card...
This card features pearls and the Fancy Fan embossing folder.
After completing this card, I decided to make a few more to swap at convention. I was up LATE last night!

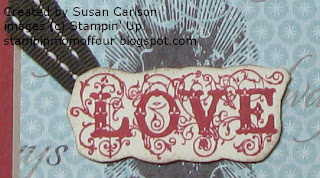
I love, love, love the new Apothecary Framelits and the coordinating Essentials Paper-Piercing Pack!  On this piece there are exactly 100 holes.  Ask me how I know!

The Papillon Potpouri stamp set along with the coordinating Elegant Butterfly punch made it near the top of my shopping list for the new catty.

I chose this pattern from the Floral District designer series paper. It was easy to choose what color butterflies to add to the card.
This card features the Argyle embossing folder.  Since I ran out of pearls I used rhinestones.
I actually like the rhinestones version better.  Which version do you prefer?


Here's this week's sketch!

  Here are a few tips that I discovered after making the cards:
I cut the string of pearls so that three would stay together.  They fit perfectly into the space on the butterfly stamp : )

While I was sponging the Apothecary frame, I kept getting some stray flecks of junk on my scrap paper. At first I thought it was something from the sponge, but it's really stray, micro fragments flaking off the card stock. ... Where did the mica flake come from???

I was too lazy to get my "embossing folders only" cutting pads, and tiny cuts got embedded into the back of my card base.  Folks, don't try this at home!


When you emboss a detailed card base like this one, the card stock shrinks a bit.  It's better to add a layer onto the card base.  Again, folks, don't try this at home!


Stamps: Papillon Potpourri
Paper: Baja Breeze, Whisper White, Floral District designer series paper
Ink: Baja Breeze for sponging, StazOn Jet Black
Accessories: Big Shot, Apothecary Accents Framelits, Fancy Fan embossing folder, Argyle embossing folder, Elegant Butterfly punch, Paper-Piercing Tool, Stampin' Pierce Mat, Essentials Paper-Piercing Mat, Basic Pearls, Basic Rhinestones, Stampin' Dimensionals

Happy Stamping!

Susan

Tuesday, July 10, 2012

Thank-You - Day 1 Creative Elements / SUO Challenge #49

I can never have enough thank-you cards.  So I recently completed several different styles to have on hand.  Most of them have a clean and simple style.  This sample is the first in a series that I'll be sharing with all of my readers.
I love the flourish from the Creative Elements stamp set.  The swirls from the sentiment coordinate with it, too.
Here's a close-up that really shows off the sparkle of the champagne mist shimmer paint.
I cased this card from Julie DiMatteo who got her inspiration from another demonstrator.   Basically, I used a different sentiment, different colors and added the Champagne Mist Shimmer Paint.  I am entering this card into the SUO Challenge #49 for Thank You cards.  If you're up for a challenge, check out their blog!

Stamps: Creative Elements, Curly Cute
Paper: Very Vanilla, Raspberry Ripple
Ink: Raspberry Ripple
Accessories: Big Shot, Beautiful Wings embosslits die, Basic Pearls, Stampin' Dimensionals, Champagne Mist shimmer paint

Happy Stamping!

Susan

Monday, June 11, 2012

Freshly Made Sketches #38


Here's the card I created for the Freshly Made Sketches challenge.

I chose the Bright Blossoms stamp set along with the Summer Smooches designer series paper.  I colored the images with markers and used the Stamp-a-ma-jig to perfectly position the top flower.  It's a pretty simple card.

Busy day today, so I've got to make this post short.  Post a comment and let me know what you think of this card.

Stamps: Bright Blossoms
Paper: Island Indigo, Whisper White, Summer Smooches dsp
Ink: markers - Island Indigo, Daffodil Delight, Lucky Limeade, Tangerine Tango
Accessories: Stampin' Dimensionals, Daffodil Delight 1/4" Stitched Grosgrain Ribbon, Stamp-a-ma-jig

Happy Stamping!

Susan

Sunday, June 10, 2012

Dynamic Duos #6 - Regal Rose and Basic Gray


Today was a lazy day at the Carlson house, so I decided to take on a challenge, Dynamic Duos

I started to combine this challenge with the Freshly Made Sketches one, but the frame image got me way off base.  Maybe I'll try that one another time. 

This was my first inking of the Papaya Collage stamp set.   I stamped the frame image in Basic Gray, then cut it out.  I used a punch to remove a lot of card stock inside the frame, then finished the job with my paper snips.  After that, I edged the outside of the frame with a Basic Gray marker. I stamped the butterfly twice, then stamped off one time creating three exact images, then I cut all three and stacked them together with Stampin' Dimensionals.  I inked up the flower image with Regal Rose and Old Olive markers and stamped off the top image, cutting off the leaf.  Those images are also stacked with Stampin' Dimensionals.  (I couldn't help add that little touch of Old Olive to the leaf. Not sure if that disqualifies me from the challenge or not.)

I stamped off the Ginkgo leaves with Basic Gray on Whisper White card stock and stacked the frame on top of that piece with Stampin' Dimensionals.  The layer under that one is Regal Rose Patterned dsp, and under that is a print from the Twitterpated dsp.  I finished the card off by adding Basic Gray Glimmer Brads, some Basic Pearls and organza ribbon custom sponged with Regal Rose to match the challenge.

I really like the set, although I'm not sure that I want to put a hat on a bird.  And where is the butterfly's body???

Stamps: Papaya Collage
Paper: Regal Rose, Whisper White, Brights Patterned Designer Series Paper
Ink: Basic Gray, Regal Rose; Basic Gray, Regal Rose and Old Olive markers
Accessories: Basic Pearls, Stampin' Dimensionals, White Organza Ribbon, Sponge, Mat Pack and Paper Piercing Tool, Neutrals Glimmer brads

Happy Stamping!

Susan

Friday, April 27, 2012

Where Have All My Merry Mondays Gone???


In January I started playing along with the Merry Monday challenge.  Being a busy mom, my reality is that I can't/don't get a challenge completed every week.  There are times that I've started a card and never even finished, or actually completed the card, but didn't take photos.  Or I've taken photos of my card, but didn't have time to post.  This week as soon as I saw the sketch, I knew exactly what I was going to do.  And I challenged myself to get it done.  I don't even think we ordered take-out this week either, LOL!

Here's the sketch:   

And here's my card:

Inspiration for this card comes from Jackie Topa.  I created the three "bulbs" using the Blossom Petals punch.  After punching out the three colors I added a highlight with my Signo white gel pen then added a layer of Crystal Effects to make them shine.  Those sat overnight to dry.  In the meantime, I stamped the pine tree from the Lovely as a Tree stamp set several times on Whisper White card stock to simulate tree branches.  I ran some Garden Green through my Stripes embossing folder, then punched out segments to make the top of the bulb, then used my Paper Piercing tool to twist the Garden Green "cord" and adhered it using Tombow multipurpose glue. The bulbs were adhered with Stampin' Dimensionals.

There the card sat for a day while I contemplated how to add my greeting.  Since I wanted to use a greeting that wouldn't detract from the bulbs, I chose the Teeny Tiny Wishes sentiment.  Looking around my stamping "corner" I could find no scraps of Poppy Parade to make my Modern Label shape.  So I resorted to this:
It's the back of my card!!!  Have any of you ever done something like this??? 

I am not afraid to say that I WON'T miss Poppy Parade.  However, I am proud that I used it all right before it retired : ) This card is going to be in my samples album, so no one will see the back.  I wouldn't dare send a card in this condition!

For a complete list of retiring stamps and accessories, go here.

Thanks for stopping by!

Stamps: Lovely as a Tree, Teeny Tiny Wishes
Paper: Poppy Parade, Whisper White, Real Red, Garden Green Daffodil Delight
Ink: Garden Green, StazOn Jet black
Accessories: Big Shot, Stripes Embossing folder, Adorning Accents edgelits die, Adorning Accents embossing folder, Blossom Petals punch, Word Window punch, Modern Label punch, Crystal Effects, Signo White gel pen, Paper Piercing Tool, Stampin' Dimensionals

Happy Stamping!

Susan